Saturday, April 21, 2012

Blueberry and Blackberry Picking in East Texas!


Oh how I love to pick Blackberries and Blueberries!  I love all fruit but there is something about picking them that just makes me smile!  It's so addicting to me, it's hard for me to stop picking!  They are just gorgeous in color and you get such a great feeling filling up those baskets!  When I was young we had wild blackberries back behind our house in East Texas, we would go out and pick them (watching for snakes) and my mom would make a blackberry cobbler!

For years (over 10 yrs) I would go to a place in Tyler, Texas called Plantation Farms  http://www.plantationpinesfarms.com/ to pick blackberries and blueberries (they don't have those now).  Several years ago I called to find out when the berries would be ready and they told me they still had a few weeks to ripen.  So I check the internet and found Blueberry Hill's Farm in Edom, Texas  http://www.blueberryhillfarms.com/ .  I called and their season happen to open that weekend, so I got my trip planned asked my friend Kari to go and we headed out early one Friday morning!  From Dallas it's about an hour and 15 minutes, 19 miles past Canton, Texas. 

Blueberry Hill's Farm is such a quaint place!  I have now gone 3 different years and plan to keep going!  Their season usually opens in June and closes sometime at the middle or end of July when there are no more berries.  I believe their store is open year round.

When you finally get to Edom you drive through this very small downtown with a few quaint diners.  I hear they are very good but I haven't gotten to eat at them yet.  After you pass downtown you go maybe less than 5 minutes and come upon this red barn, once you see that you are there!

Once you get there you walk into the barn and they have some wooden baskets for you to place your berries in so you pick up one and then they will tell you where it is best to start picking!!

If you are wanting blackberries it's best to get there early early because there aren't as many bushes and they get picked over.  Everyday they have some but it all depends on their crop for that season.  I looked at their website and they say they are going to have a really good crop this year because of all the rain!!!!  Yipee!!!

Another great website http://www.pickyourown.org/ this site lets you pick your State then your area and list different farms where you can pick pretty much anything!  I have gone to a few local places by me for vegetables. They list farms by Counties once you get to the State you live in it's amazing to look at what is in your area!  From Apples to squash to watermelon!

For the Dallas area folks there is a farm I keep saying every year I am going to go to but haven't yet!  They grow strawberries!!  It's called Gnismer Farms and right now they show what produce is ready to pick but they don't have the strawberries on there yet here is the link http://www.gnismer.com/ to their website.  The farm in in Arlington off Bowen Rd.

Below are some pictures I took last year when we picked Blueberries and Blackberries.  I rode down with my friend Madeline and her son Jude.  My sister, two nieces and my great nieces and nephews met us there.  We had alot of fun but word to the wise.....go early in the morning because if it's after May it gets pretty hot!! 


Oh and check out my  blueberry muffin recipe because I am telling you it's one of the best recipes I have found!  I got the recipe from my friend Adriane and I am so glad she told me about it!  I have even just this month made over 20 dozen blueberry muffins and I still say, man that is a good muffin!  They freeze well for later too... Makes 30 muffins!


We are here at Blueberry Hill's Farm!  Waiting on the rest to get here!
With me are Brianna (my friend Anna's daughter) and Jude, his mom Madeline is here too.


They have a few fun things like this for the kids!

We are listening to what rows of blueberries we should go to first! My sister Tammy is in the orange shirt, my niece Hannah is in the blue then my great niece's and nephews, Hunter, Pheonix and Faith oh and Maverix is in the stroller.


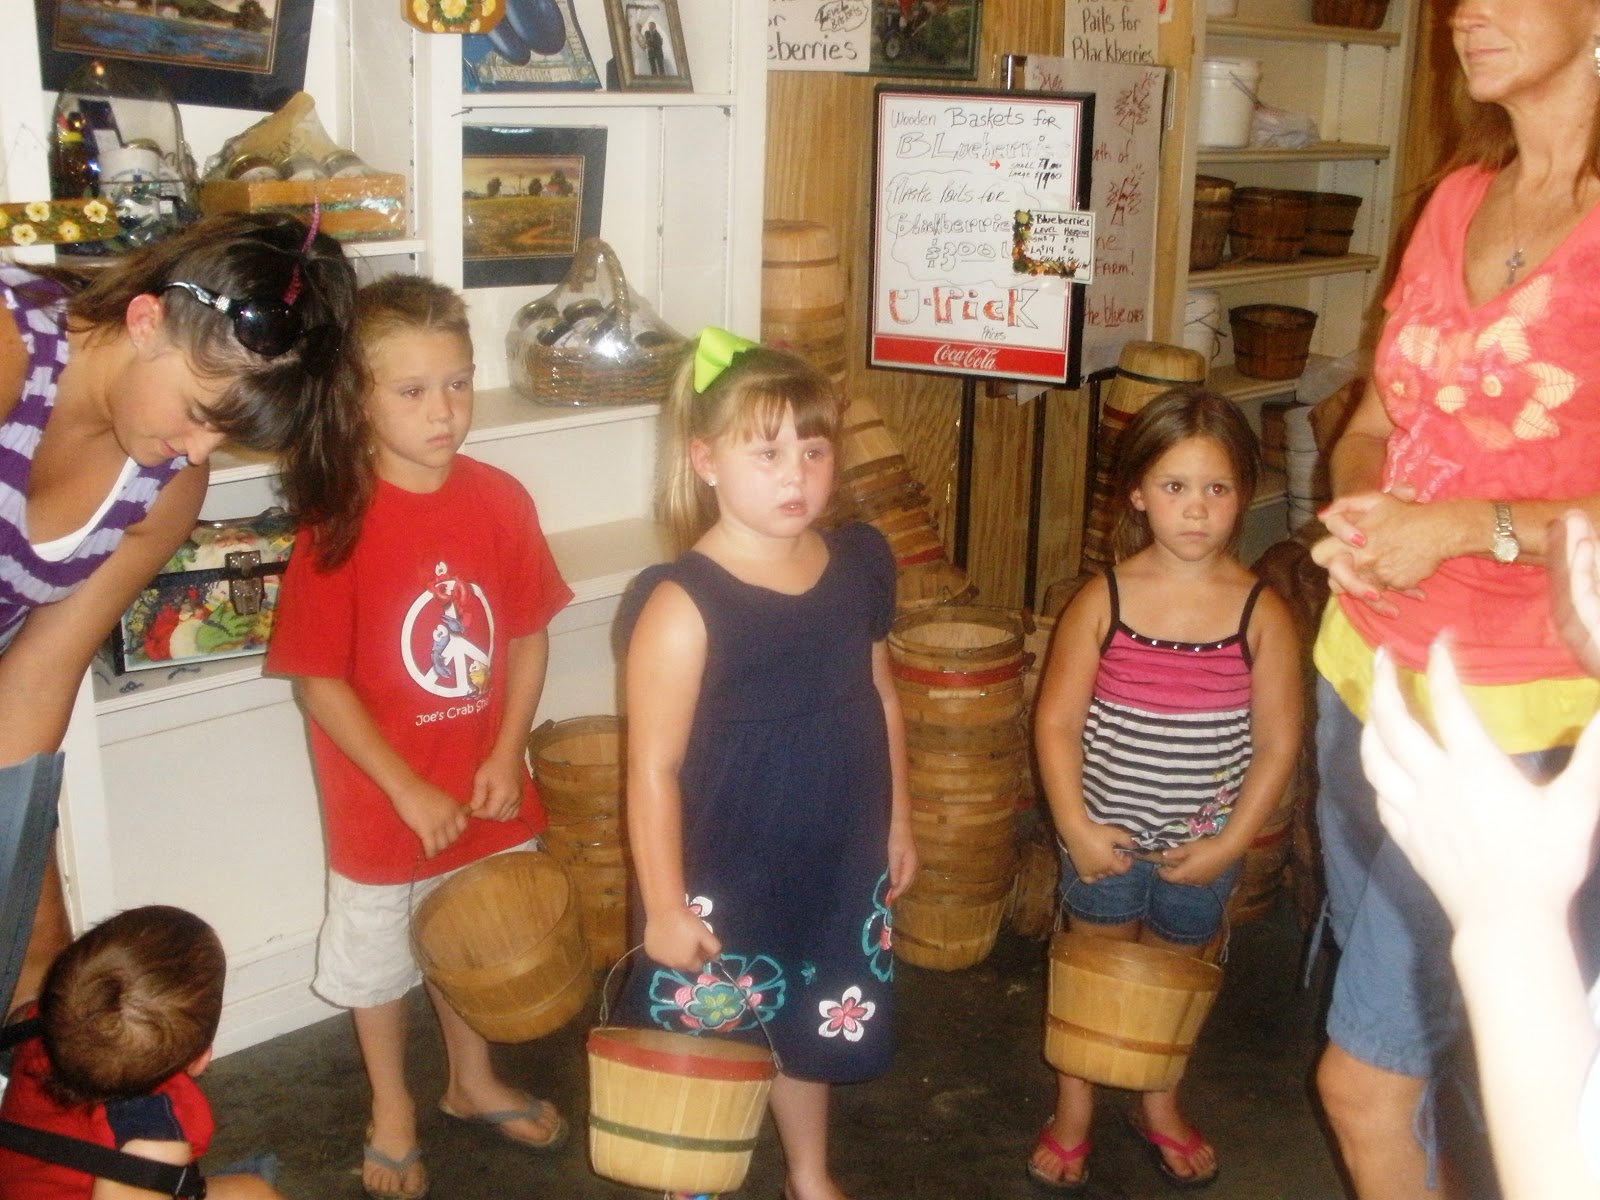
Leslie, Maverix, Hunter, Pheonix, Faith and Tammy getting ready!

Here we go!


Blackberries not ready...most of the riped ones had already been picked that morning.


These weren't ready either but we did find a few but we had to look hard.


Walking to get to the ripe blueberries.


We found them!


Hunter LOVES to pick berries!!


Maverix being a trouper!


Half way full!


Faith is picking away but getting hot!


Brianna showing off her berries!


Maverix was being so good even though he was sooooooo Hot!! 


Heading back


We made it back to the air condition, finally!  Look at all those jars of jam!  If you look past
the jam you will see the counter where you can order blueberry lemonade, blueberry muffins, ice cream and more!


Blueberry lemonade, just what he needed!!


and the large fan!!!  Isn't he a cutie!


They needed the fan too!!!  It was soooooo hot!


We all came in and Hunter was still picking....he gets as obsessed as I do with picking!


A FULL basket!  He is sooooo proud!


Faith showing off her hard work!


Good job Pheonix!!


These are all mine ;)  I told you I get obsessed with picking berries!


Saturday, April 14, 2012

Peanut Butter Snicker's Bar Cookies

I got this recipe from my friend Shari.  I went to Minnesota to visit her and her family in August of last year.  I came back with some really good recipes, like I felt like I hit a gold mine!  Shari and I went to school together back in the 80's but we lost touch with each other after she moved back to Minnesota. I thought of her often and one day she found me on facebook!  That facebook has a way of reconnecting friends, I was so excited she found me!

When I was in Minnesota we went to this Awesome Pizza Farm!  I need to post about that later!

For these cookies you basically just make peanut butter cookie dough (recipe below) then take a portion of it (dough is soft...just fyi) and place the mini snicker bar underneath and wrap the dough around it then place on cookie sheet.  Bake for 15 to 17 minutes! 

Let cookies cool for about 5 minutes then drizzle some chocolate on top!  When I am making melted chocolate for something like this I just grab some chocolate chips and melt about 1/4 to a 1/2 a cup in either a double boiler on the stove or a bowl in the microwave.  I add about a tsp of shortening to help the chocolate harden.  If your in a hurry and need the chocolate to harden stick the pan in the fridge for about 10 minutes!


This peanut butter cookie recipe is really good too just by itself but add a snicker and top it with chocolate and it's divine!


You will need a bag of mini snickers and some chocolate chips (melted) to drizzle on top.


Peanut Butter cookies

1 stick of unsalted butter (softened)
3/4 cup peanut butter
1/2 cup sugar
1/2 cup light brown sugar
1 egg
1 tsp vanilla
1 cup flour
3/4 tsp baking soda

Heat oven to 350 degrees. Line several baking sheets with parchment paper (optional) and set aside. In a medium bowl cream butter, peanut butter and both sugars together until light and fluffy using a mixer. Add egg and vanilla, and mix on medium speed until well combined. In a medium bowl sift flour and baking soda together. Add to the butter mixture and beat just to combine. Scoop out 2 tablespoons of dough, shape into a ball, and place on one of the prepared baking sheets. Repeat with remaining dough, placing scoops 3 inches apart. Dip the tines of a fork in warm water; press the dough balls lightly with the back of the fork to flatten them slightly (dip the fork back in the water for each dough ball, to prevent sticking). Sprinkle with a few peanuts, if desired. Transfer to the oven, and bake until golden brown about 15 to 17 minutes


Take a portion of the dough and place the mini snicker bar underneath and wrap the dough around it then place on cookie sheet.  Bake for 15 to 17 minutes! 

Let cookies cool for about 5 minutes then drizzle some chocolate on top!  When I am making melted chocolate for something like this I just grab some chocolate chips and melt about 1/4 to a 1/2 a cup in either a double boiler on the stove or a bowl in the microwave.  I add about a tsp of shortening to help the chocolate harden.  If your in a hurry and need the chocolate to harden stick the pan in the fridge for about 10 minutes!


Thursday, April 12, 2012

Pineapple Upside Down Cake


Pineapple Upside Down Cake!  I always forget how much I do love this moist cake! 

I made this last week and forgot to get the pictures during the making process.  I had the camera out and everthing but forgot!   It's so very easy to make!  I used canned pineapple, recipe calls for fresh and then I added some maraschino cherries for color! 

Basically in a iron skillet just melt the butter and add the brown sugar then simmer over medium heat for about 4 minutes.  Take off heat and add the pineapple rings along with maraschino cherries.

After you make the batter (instructions below) pour over pineapple rings, spread to make it even then bake, it's that easy!

Let cake cool for 5 to 10 minutes then turn upside down.  Should come right out with all that butter and sugar at the bottom.


 Just out of the oven

After 5 minutes out of the oven...perfection!


For topping:
  • 1/2 medium pineapple, peeled, quartered lengthwise, and cored
  • 3/4 stick unsalted butter
  • 3/4 cup packed light brown sugar

For batter:
  • 1 1/2 cups all-purpose flour 
  • 2 teaspoons baking powder
  • 1/4 teaspoon salt
  • 3/4 stick unsalted butter, softened
  • 1 cup granulated sugar
  • 2 large eggs
  • 1 teaspoon vanilla
  • 1 tablespoon dark rum  (optional)
  • 1/2 cup unsweetened pineapple juice
  • 2 tablespoons dark rum for sprinkling over cake (optional)
  • Maraschino cherries (optional)
   You will need a  10-inch cast-iron skillet
·        Preheat oven to 350°F.
·        Make topping:
Cut pineapple crosswise into 3/8-inch-thick pieces. Melt butter in skillet. Add brown sugar and simmer over moderate heat, stirring, 4 minutes. Remove from heat. Arrange pineapple on top of sugar mixture in concentric circles, overlapping pieces slightly.
·        Make batter:
      Sift together flour, baking powder, and salt. Beat butter in a large bowl with an electric mixer until light and fluffy, then gradually beat in granulated sugar. Add eggs, 1 at a time, beating well after each addition. Beat in vanilla and rum. Add half of flour mixture and beat on low speed just until blended. Beat in pineapple juice, then add remaining flour mixture, beating just until blended. (Batter may appear slightly curdled.)
·      Spoon batter over pineapple topping and spread evenly. Bake cake in middle of oven until golden and a tester comes out clean, about 45 minutes. Let cake stand in skillet 5 minutes. Invert a plate over skillet and invert cake onto plate (keeping plate and skillet firmly pressed together). Replace any pineapple stuck to bottom of skillet. Sprinkle rum over cake and cool on plate on a rack.
·        Serve cake just warm or at room temperature


Wednesday, April 4, 2012

Raspberry Bars

I got this recipe years ago from my Aunt Dana. I remember the first time I had one at her house, simply delicious!  They remind me alittle bit like shortbread because you can taste the butter with each bite!  The raspberry jam goes well with this but I have also used apricot jam and strawberry jam too! 

This is one of those recipes that is easy to make and taste like you spent along time making! 

You want to buy jam or preserves, here is the differences between jelly, jam and preserves
  • In jelly, the fruit comes in the form of fruit juice.
  • In jam, the fruit comes in the form of fruit pulp or crushed fruit (and is less stiff than jelly as a result).
  • In preserves, the fruit comes in the form of chunks in a syrup or a jam.


In a bowl combine butter, sugar and egg

Chop pecans or walnuts (nuts are optional)

add flour, oatmeal and nuts to the egg mixture, once combined put half of the dough into a 9X9 pan then heat up the jam for about 15 to 30 seconds (makes it easier to spread) and spread over the bottom layer, drop dough that is left on top and gently spread onto the jam.  Doesn't have to cover it all leave some of the jam peeking through.


                                    Raspberry Squares

1 cup butter (melted)
1 cup sugar
1 egg yolk
2 c flour
1/2 cup oatmeal
1//2 cup chopped nuts
1 10 oz jar raspberry jam (or apricot, strawberry etc)

Preheat oven to 350 degrees spread ½ mixture into bottom of 9X9”
Dish cover with jam

Drop carefully spread remaining dough on top

Bake until golden brown 40 to 45 minutes

Let cool slightly before cutting into squares

Sunday, April 1, 2012

Fried Chicken Salad

The first time I had fried chicken salad was at a great restaurant in Dallas called Hattie's over in the Bishop Arts area in Oak Cliff.  Wow!  I never really thought about that for a salad but it's pretty good!  Basically it's chicken nugget/tenders that you make up pretty quick and add them to your salad.

I made some Creamy Italian Dressing to go with the salad but you could do Ranch (recipe is with link to Creamy Italian), Honey Mustard (one of my favs and recipe is on link also) or your favorite. There are some really good salad dressing on here you can click on the link to Creamy Italian Dressing or on the side of the blog there is a link for salad dressings.  It takes 5 mintues to make and it's totally worth making it yourself!

If I had planned ahead I would have soaked the chicken in some buttermilk.  I know you are like what?  It really makes the chicken so tender and juicy!  If you are able to marinate it in buttermilk you can omit the egg and milk and just use the buttermilk in place of that.  That buttermilk has away of helping the flour cling to the chicken and it also gives it a beautiful color!

I plan to post regular fried chicken in the next few days.  For that I will soak it in buttermilk over night or for at least 6 hours.  It gives it a beautiful mahoganyny color and it's so juicy and good!

I just add about and inch of oil to the pan.  I had wasting oil and honestly that is all it needs! 


Combine flour, pepper and Lawry's Garlic Salt (with green lid)


dredge chicken pieces in flour


then coat with milk and egg mixture


then coat again in flour mixture


In a skillet heat oil to medium/ high heat then add chicken, if you add chicken to oil before it's hot the chicken will absorb oil and be soggy.


cook until chicken is browned on both sides about 10 to 15 minutes


This is just using 1 chicken breast!  It's amazing how many nuggets you can get from one chicken breast!


Fried Chicken Salad

1 to 2 chicken breast (is enough  for 4 to 6 people)
2 cups flour
¼ tsp Lawry’s Garlic Salt with green lid 
¼ tsp Black Pepper
Vegetable Oil
2 eggs
½ cup milk
In a shallow pan or pie plate combine dry ingredients, in another shallow pan combine milk and eggs and whisk together.
Cut Chicken into nuggets size pieces.  Dredge chicken pieces into the flour then to the egg mixture and back to the flour mixture. 
Heat oil in medium size skillet, once oil is hot enough start dropping chicken into skillet.  Cook on medium to high heat more medium but you want the oil hot enough so that when you place it in the skillet you can see it bubble around it but you don’t want it too hot that it burns it. 
Cook 10 to 15 minutes then place on a plate with a paper towel so it can absorb some of the excess oil.
Make your salad however you want it!  I generally use green leaf lettuce and maybe one more like ice berg or red leaf.  Then I add cucumbers, tomatoes, red onion and some freshly grated cheese.


Newer Posts Older Posts Home